|
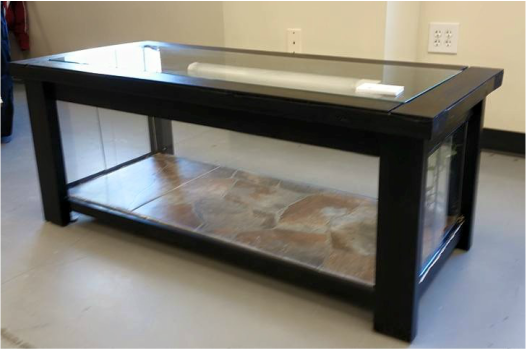
Reptile Coffee TableThis is an elegant way to integrate your pet into your home. Who says you have to enjoy your pets less just because they are in a cage?
This unit, as designed, contains 1 enclosure 49" long x 19.5" wide x 17.5" tall. It is built in four main parts, the top, the two long sides, and the floor. When completed the coffee table measures 52" long x 24" wide x 21" tall. |
Materials and ToolsLumber - Use any kind of wood you like, popular choices are cedar, pine or oak:
1- 8' x 4' 1/4" plywood sheets 2 - 6' pieces of 1" x 2" 2- 6' pieces of 1" x 3" 2-8' pieces of 2" x 4" 2-8' pieces of 2" x 6" 1/4" thick Glass and 1/4" Plexiglass: 2-plexi glass pieces cut to size of long side (about 44" x 15") 4-plexi glass pieces cut to size of short side doors (about 10.5" x 13.5") 2-plexi glass pieces of 19.5" x 3" (optional) 1- 1/4" glass table top 44" x 16" Glass Door Track: 2- 3' long sets of 1/4" E track (typically only available online) 1 -3' long set of 1/4" U track (optional) Pocket Screw Jig: 1 - pack of 100 coarse 1 1/4" screws for pocket screw holes Screen Wire: 1 - small piece (~1' x 1') Glue Gun: 1 - pack of about regular glue sticks Linoleum: 2 - linear feet sheet vinyl flooring Glue: 1 - large bottle of gorilla glue or similar 1 - bottle of wood glue Wood Stain: 1 - can of wood furniture stain Misc: 1 - pack of hooks for hanging light sockets and decor 1 - pack of small zip ties 1 -1.5" hole saw 1 - pack of 1/2" screws with a flat head 1 - pack of 1/2" screws with a flat underside of the head 1 - can of plastic spray paint (optional) Reptile Items (as needed): 2 - under tank heat pads 2 - heat lamp sockets 1 - 24" UVB light fixture 2 - twist in light sockets 2- sliding glass door locks |
Step 1: Lumber CutsThe top of the coffee table will be made using the following cuts:
2 - 24" pieces of 2" x 6" cut at a 45 degree angle (part A) 2 - 52" pieces of 2" x 6" cut at a 45 degree angle (part B) 2- 52" x 4" 1/4" plywood (part C) 2- 16" x 4" 1/4" plywood (part D) The two long sides of the coffee table are made from the following cuts: 4 - 19.5" pieces of 2" x 4" (table legs - part E) 2 - 43.5" pieces of 1" x 3" (horizontal beam - part F) 2- 43.5" pieces of 1" x 2" (horizontal beam - part G) The floor of the coffee table is made from the following cuts: 1 - 49" x 19.5" piece of 1/4" plywood (table floor- part H) 2- 19.5" pieces of 1"x2" (horizontal side beam - part I) Miscellaneous support beams of the coffee table is made from the following cuts: 3- 19.5" piece of 1" x 3" (beam to support floor or hold sides together - part J) Step 2: Pocket Screw HolesUsing a pocket screw jig, drill the holes in the following pieces:
Part A - Drill a total of 4 holes in each piece Sides: 2 holes 1.5" from each edge on each side, flush with the 45 degree angle Part E - Drill a total of 2 holes in the piece Top: 2 holes 1" from the edge Parts F and J- Drill a total of 4 holes in the piece Sides: 2 holes 0.25" from each edge on each side Parts G and I - Drill a total of 2 holes in each piece Sides: 1 hole in the center on each side Print Shop in the UPS Store Sayre PA 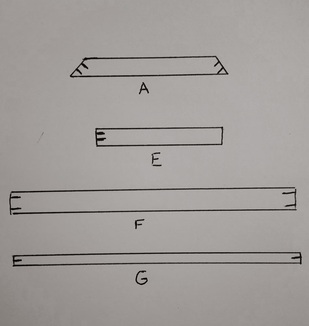
|
Step 3:
|
On a flat and level surface, arrange parts A and B to make a table top. One at a time clamp the joints together and use pocket screws and wood glue to hold them together. Let the glue dry.
Place the glass piece on the opening of the table top and center it exactly. Mark where the glass ends. Line up parts D to the marks to make a glass inlay. Use a combination of wood and gorilla glue to glue town parts D one at a time with clamps. Continually check that the glass will fit the inlay area. Now repeat these steps with parts C. The short ends of part C may need to be sanded down to fit between parts D. Once the table top is completely dry sand the edges so that the outside of C and D are flush with the outside of A and B. Check again that the glass inlay will fit. If not, sand the inside edge of parts C or D. Drill pilot holes for hooks and screws to mount any lighting you need. Stain the table top with the color of your choice. Print Shop with the UPS Store in Sayre Pennsylvania |
Step 4:
|
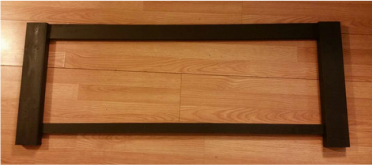
Pocket hole sides up line up part F with the top of part E (table leg). Place a piece of scrap 1"x2" under part F so that the 2 pocket screw faces are about level. Screw part F into part E and repeat on the other side to make a "U" shape. Now place part G 2" from the bottom of part E (table leg). Again, place a piece of scrap 1" x 2" under part G so that the faces are level. Screw part G into part E. Make sure to reinforce your joints with wood glue as you go. Repeat this step to assemble the other long side.
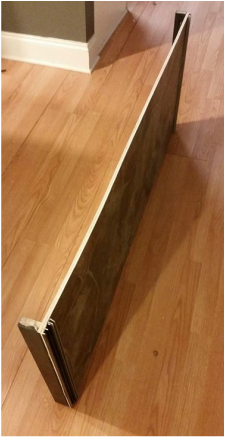
Stain the side pieces with the color of your choice and let it dry completely. Measure the opening in the piece. Add 2" to the width and 1" to the height and get a piece of plexi glass cut to this size. Mark 5 drill holes on each short side of the plexi glass. Line up the plexi glass on the flat side of the wood piece. Make sure there is a large overhang of plexi glass on the top support beam, and very little overhang on the bottom support beam. Drill the 5 pilot holes on each side. Use the screws with a flat underside of the head to screw the plexi glass piece into place. Now mark and drill holes in the top support beam plexi glass over hang. Screw the top side of the plexiglass into place. The bottom side of the plexi glass will but right up to the floor piece of the table. Use a small amount of gorilla glue on the inside seam between the bottom of the plexi glass and the wood of part G (bottom horizontal support beam). Wipe the gorilla glue after applying so only a small seam remains. |
|
Drill 5 pilot holes for screws in each of the short sides of part H (1/4" plywood floor). Line up part I (horizontal side beams) on either end and screw the plywood into them using screws with a flat head. Make sure the pocket screw holes face towards the inside.
Stain the pieces with the color of your choice and let it dry completely. It is not necessary to stain the top side of the plywood as linoleum will be added later. Coat the plywood with gorilla glue and attach a linoleum piece to cover the entire top of the plywood surface. Turn the floor linoleum side down and place weights such as text books or paint cans on it while the gorilla glue drys. If desired, one part of the floor can be left unglued in order to create a pocket that a heat pad or heat tape can be placed in. Cut two sets of E track to 19.5." If desired spray paint the tracks a color similar to your wood stain. Apply a thin line of gorilla glue to a piece of bottom E track. The shorter piece of the pair is the bottom track. Smear the glue with a paper towel. Gorilla glue expands greatly so very little glue is needed on the pieces of track. Place the track on the edge of the linoleum and clamp down until the glue is dry. Wipe up any glue that expands out from under the track. Repeat this to add track to the other side of the floor piece. If substrate is going to be used cut 2 pieces of U track to 19.5." Glue these pieces of track behind the "E" track in the same manner as before. Into each track, glue a piece of 19.5" x 3" plexi glass. |
Step 6:
|
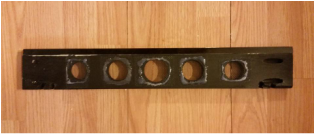
Using the 1.5" hole saw, drill 5 ventilation holes into two pieces of part J (support beams). Drill electrical cord pass holes using the pocket screw drill bit into the top of one or two of the support beams. Use these holes to pass cords through before the table top is attached.
Stain these two pieces with the color of your choice and let them dry completely. Cut pieces of screen wire to fit over these holes. One at a time, place the screen over each hole and hot glue it into place. The key is to get the hot glue gun extremely hot so that the glue will melt through the screen and onto the wood. Once the ventilation is added, glue a top piece of E track onto the bottom side of each piece. Be sure to apply a thin line of gorilla glue, smear it with a paper towel and clamp until it drys. |
Step 7:
|
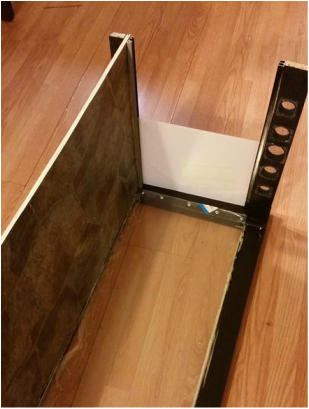
Screw in the floor piece to the long side so that the linoleum is touching the bottom of the plexi glass. It should be about 2" from the ground and centered on the legs. Measure the distance from the edge of the leg to the support beam of the floor. This should be about 3/4" on either side. Add heat pads or heat tape in the flooring pocket if desired.
Offset the two ventilation support beams this same distance from the edge of the legs. Make the top of these beams flush with the top of the leg. Now center the other long side onto the floor and ventilation support beams. Screw the floor and beams into the side to match the first side. Take the unstained part J (support beam) and screw it under the center of the 1/4" plywood floor. Set the table upright and measure the small side openings. Follow the directions from the E track to get appropriately sized doors cut. Place doors in the openings. Place all of your lighting into the enclosure and run the cords through the cord pass holes. Center the table top onto the base and use the pocket screw holes on the top of the legs to screw the table top into place. Mount lights and place the glass tabletop into the inlay. |