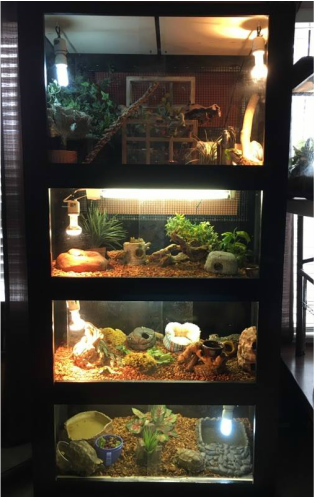
The Reptile ShelfWhen one has more reptiles than space, a reptile shelf is an elegant way to make sure you get to enjoy all your pets without them overwhelming your home.
This unit, as designed, contains 5 enclosures for your animals. 3 are terrestrial style and 2 are arboreal style. It is built in three parts, the base, the front facing and the back facing. When completed the shelf measures 36" wide, 18" deep and 72" high. (Note that the photo shows a custom built enclosure that did not include dividing the top shelf into two enclosures) |
Materials and ToolsLumber - Use any kind of wood you like, popular choices are cedar, pine or oak:
2 - 8' x 4' 3/4" plywood sheets 3 - 6' piece of 1" x 2" 6 - 6' pieces of 1" x 4" 1/8" to 1/4" thick Glass or 1/4" Plexiglass: 8 - 19" long glass pieces measure height to fit openings once assembled Glass Door Track: 4 - 3' long sets of 1/4" E track (typically only available online) Pocket Screw Jig: 1 - pack of 100 coarse screws for pocket screw holes 1 - pack of 100 fine screws for pocket screw holes Hardware Cloth: 1 - roll of plastic 1/4" or 1/8" opening hardware cloth Staple Gun: 1 - pack of about 1/2" staples Linoleum: 3 - linear feet sheet vinyl flooring Glue: 1 - large bottle of gorilla glue or similar Wood Stain: 1 - can of wood furniture stain Misc: 1 - pack of hooks for hanging light sockets and decor 1 - pack of small zip ties Reptile Items (as needed): 5 - under tank heat pads 5 - heat lamp sockets 3 - 24" UVB light fixtures 2 - twist in light sockets 4- sliding glass door locks |
Step 1: Lumber CutsThe base of the reptile shelf will be made with the 3/4" plywood using the following cuts:
2 - 72" x 18" (sides) - "Part A" 5 - 18" x 36" (shelves and top) - "Part B" 1 - 17 3/8"x 22.5" (top shelf divider) - "Part C" **(See Step 9) The front and back facing of the reptile shelf is made from the following cuts: 4 - 72" pieces of 1" x 4" (shelf legs) "Part #1" 4 - 30.5" pieces of 1" x 4" (front facing on shelves, back facing on top) "Part #2" 2 - 30.5" pieces of 1" x 2" (front top and bottom horizontal pieces) "Part #3" 1 - 20.75" piece of 1" x 2" ( vertical front facing) "Part #4" 1 - 30.5" x 10.5" piece of 3/4" plywood (back facing on bottom shelf) "Part D" 2 - 30.5" x 11.5" pieces of 3/4" plywood (back facing on shelves) "Part E" 1 - 30.5" x 13.5" piece of 3/4" plywood (back facing on top shelf) "Part F" Step 2: Initial Pocket Screw HolesUsing a pocket screw jig, drill the holes in the following pieces:
Part B - Drill a total of 10 holes in each piece Sides: 4 holes 1" from each edge, 4 holes 2" from each edge, 2 holes in the middle Part C - Drill a total of 10 holes in the piece, 5 on the front and 5 on the back Left Side: 1 hole 1" from the top, 1 hole in the middle Right Side: 1 hole 1" from the bottom Top: 1 hole 7.5" from the left side, 1 hole 1" form the right side Flip the piece over to the back so that the right side is now the left and repeat Part D, E, F- Drill a total of 6 holes in the piece Sides: 4 holes 1" from each edge, 2 holes in the middle Part #2 - Drill a total of 4 holes in each piece Sides: 4 holes 1" from each edge Part #3 and #4 - Drill a total of 2 holes in each piece (middle) Sides: 2 holes in the middle |
Step 3:
|
Take 4 "Part Bs" and place the side with the holes face down. Cut 4 pieces of linoleum to fit over the edges of the wood pieces. Apply gorilla glue to the wood face and smooth linoleum over. Add as much weight as possible on top of the linoleum using other pieces of lumber or books. Let the glue dry over night. Trim edges to fit the wood piece exactly the next day.
Optional: if you want to use under tank heat pads, place them between the linoleum and the wood. Do not glue the linoleum where you would like to place a heat pad, instead glue around the area to create a "pocket" that the heater can be slid in and out of. |
Step 4:
|
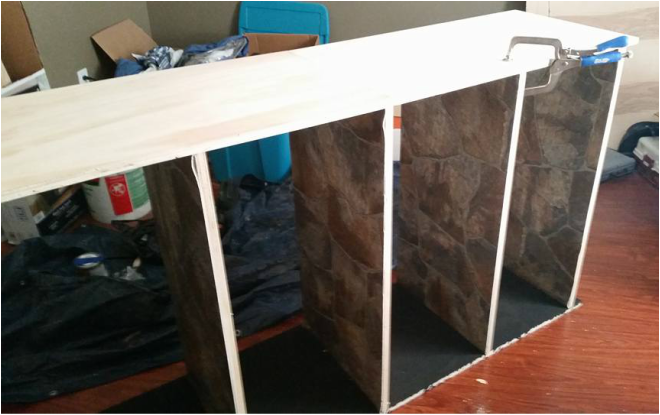
Using a right angle pocket screw clamp, screw the top piece (Part B) onto the sides (Parts A) at a 90 degree angle. To make the basic structure of the shelf.
Lay the furniture with the front side facing up and attach the top shelf divider (Part C) to the top piece (Part B). Make sure part C is flush with the back side of the furniture, not the front. Add a shelf (Part B) to the bottom of the divider (Part C). Screw this part B into the sides (Parts A) and then screw the divider (Part C) into the shelf (Part B). Add the three remaining shelves (Parts B) at any spacing you wish. Screw them into the sides (Parts A). It is recommended you add the bottom shelf 2" from the bottom of the reptile shelf, but this is not required. |
|
1" under each shelf and the top (Parts B) along the sides (Parts A), drill a pocket screw hole facing towards the front. These will be used to attach the front facing. In the middle of each shelf and the top (Parts B) drill a pocket screw hole facing towards the front. In total you should have 5 screw holes in each part A, facing towards the front and 1 screw hole in each part B facing towards the front. This makes a total of 15 pocket screw holes. Flip the base of the reptile stack over so that the back side is facing up. Repeat pocket screw hole drilling in the exact same manner as the front side. When finished flip the furniture over again so that the front side is facing up. |
Step 6:
|
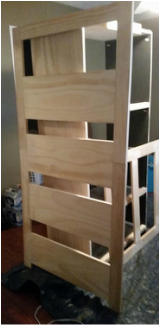
Screw the top piece (Part #3) onto the legs (Parts #1) to make a "U" shape. Make sure the pieces are clamped together while screwing to ensure a flat surface between the wood pieces.
Place the "U" shape on top of the base so that it lines up. Mark on part #3 where the vertical front facing needs to be placed (Part #4). Screw the facing (Part #4) into the top piece (Part #3). Add a horizontal front facing piece (Part #2) so that it is flush with part #4. Screw part #2 into parts #1 and screw part #4 into part #2. Place the front facing on top of the base again. Mark on the legs (Parts #1) where the front facing for the shelves (Part #2 and Parts #3) needs to go. Screw these parts (Part #2 and Parts #3) into the legs (Parts #1). |
Step 7:
|
Screw the top piece (Part #2) onto the legs (Parts #1) to make a "U" shape again.
Place the "U" shape on top of the base. Mark on the legs (Parts #1) where the back facing for the shelves (Parts D, E, F) needs to go. Screw these parts (Parts D, E,F) into the legs (Parts #1). |
Step 8:
|
Stain the shelf, front facing and back facing in the color of your choice before continuing with construction.
Cut pieces of hardware cloth to cover the four openings in the back facing. Use the staple gun to attach the hardware cloth to the side of the back facing that has screw holes. |
Step 9:
|
Cut the glass door track so that there are 4 sets of 3' long track. Each set should have a short piece and a tall piece. Using clamps and weights, attach each tall piece of glass door track to the front underside of each shelf. Let these dry overnight. Using clamps and weights again, attach each short piece of glass door tack to the front top side of each shelf. This will be directly on the linoleum. Let these dry overnight.
Note that gorilla glue expands quite a bit. It is best to apply a thin line onto the glass door track and then spread it with a paper towel to remove excess. Check on the tracks 30 minutes after clamping and adding weights to wipe up any glue that has spilled over. Follow the directions that came with the glass door track to get glass or plexiglass cut to an appropriate size. **Optional: If you are planning to use a significant amount of substrate in the enclosures, attach the glass door track to the facing instead of the base. This may look less appealing, so is is not recommended unless substrate is going to be used. Additionally you will want to get the top shelf divider (Part C) cut to 18" x 22.5" instead. |
Step 10:
|
Stand up the base of the reptile stack and line up the front facing. Use the previously made pocket screw holes in the base to screw the front facing onto the base. Repeat this for the back facing.
Mount lights using hooks, zip ties, screws etc, depending on the light fixture. Drill holes and/or cut hardware cloth as needed to run cords for heat pads and lights into the tank. |


